How to barcode a product
With the help of GS1 identification standards such as barcodes, a physical product or item is connected to its digital world. In this list of seven points, we will tell you what is good to consider when barcoding your product.
1. Create unique identifiers using the GS1 Company Prefix
All GS1 identifiers and barcodes are generated using the GS1Company Prefix. You can conveniently order it from our webshop.
Learn about GS1's identification standards, which are used to create identifiers for products, locations, and parties, among other things. If you need GTIN codes or GLN numbers, they are easy to create, maintain and manage in the GS1 Rekisteri.
2. Select an identification type
The requirements for the type of barcode depend on where and how the barcode is read. For example:
- If the barcode is read with a POS terminal, it must be marked with an EAN-13 or EAN-8 barcode.
- If the barcode needs to contain additional information in addition to the GTIN code, such as a batch number or a best before date, a GS1-128, GS1 DataBar, GS1 Datamatrix or EPC/RFID identifier should be used for labeling.
- If the barcode is scanned outdoors or in dirty conditions, GS1 Datamatrix or EPC/RFID tag are suitable as they are very durable. The GS1 Datamatrix is more wear resistant than other barcodes and can also be printed directly onto metal. The EPC/RFID tag can be read from a greater distance than a barcode.
- If the barcode is printed directly on corrugated cardboard, the ITF-14 barcode is the most suitable option. In this case, however, the product cannot be read at cash registers, i.e. the label is not suitable for consumer packaging.
3. Specify the barcode size
The size of the barcode is affected by the selected barcode type, reading environment and printing method. Certain printing methods may have a limit to how small a barcode can be printed without quality degradation. The scanning environment also affects the code size. For example:
- For an EAN-13 barcode, the minimum size is 29.83 mm x 18.28 mm and the maximum size is 74.58 mm x 45.7 mm
- For an EAN-8 barcode, the minimum size is 21.38 mm x 14.58 mm and the maximum size is 53.46 mm x 36.46 mm.
4. Add plain text
If the barcode cannot be scanned, its content must be readable using plain text, called Human Readable Interpretation (HRI). Below are a few rules from the standard:
- The font must be clear and easy to read.
- The plain language text of the EAN-13 barcode must be placed below the code, but in ITF-14 and GS1-128 barcodes it can also be placed above the code.
- If an application identifier is used, it is written in parentheses in the plain text. Parentheses should not be placed inside the barcode.
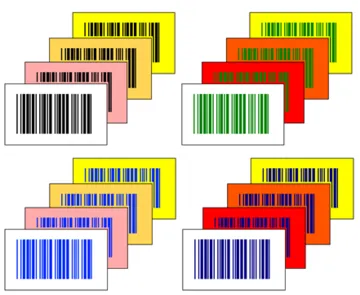
5. Select the barcode color
The best color combination for a barcode is black lines on a white background. If you want to use other colors, it is important to make sure that the barcode can be read without problems. In any case, the barcode must be in a dark color and the background light. Since scanners often use red light, red tones such as red, pink, light yellow and orange backgrounds should be avoided.
6. Specify the location of the barcode
The barcode should be positioned so that it is easily readable. Printing or gluing the barcode on corners, folds, folds, seams and other uneven surfaces should be avoided.
The print direction of the barcode often affects the print quality of the barcode. This should be taken into account when planning the design of the product and the location of the barcode.
7. Select a barcode provider
If you need a large number of labels with the same barcode or want the barcode to be printed directly on the packaging, it is a good idea to contact an advertising agency or printing house.
If you only need a small number of labels with the same barcode or you want to mark pallets, in which case each label is different, you should take care of the printing yourself. Then it can be good to contact the suppliers of printers and programs.
You can create, save and print barcodes in the GS1 Rekisteri. However, make sure that the print quality is sufficient to scan the barcode.